 Have you ever wished that your Windows installation was a little more customized to your liking? You Like the idea of a Widget bar but not the implementation Microsoft has chosen? Then this topic is specially for you!
I will show you how to add totally custom themes to Windows (not just the ones that Microsoft has), Customize the start button, login screen and windows startup animation.
First off, Windows XP users (and I imagine Vista, but untested) cannot use these themes or methods of changing the startbutton and logon screen. They can however use the Rainmeter portion (also untested, if someone can please verify for me). All the links and my own work on Rainmeter can also be found on my DeviantART page. You can go there and download the skin if you already know how this works and just want the skin, if you want to learn how to customize your Windows installation to your own taste, keep reading….
Ready your system for themes
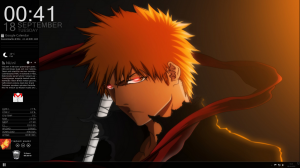
The standard windows themes are a bit boring, and although Microsoft has some more themes to download from their site it all looks the same really. You can install custom themes with the .themepack extention without problems but the best custom themes (.theme, with directories full of files) are the best because they also bring custom designed buttons and the like. So let bring in some custom themes, for this example I use the theme in the picture above named Crystal Gloss, a dark transparent theme.
First off lets make a system restore point just to be sure. Also, make a directory somewhere and copy every file that needs to be delete or renamed, that I mention in this tutorial, first to that directory so you can always go back to the original without much problems.
Hit <WINDOWSKEY> + R to start a Run prompt, type rstrui.exe and hit enter. In the next screen hit next a few times and finally Finish to create a system restore point.
Okay now we are safe and secure we can patch the system to allow for the changes we need. Go ahead and download Universal Theme Patcher. This piece of software patches uxtheme.dll, themeui.dll and themeservice.dll to allow the custom themes. These files are automatically backed up by the application once you patch them so you can easly go back to the originals.
It comes with 2 executables for x86 and x64, make sure to run the right one for your system with administrator privileges.

After this the Universal Theme Patcher opens up, its as easy as just clicking the 3 patch buttons on the main screen and we are done.

Install a theme
As I said I used the one named Crystal Gloss in my example (and also in daily use), but you can feel free to choose another one ofcourse. DeviantART is a good source for that, just search for Windows 7 Theme. Make sure your new theme has a .theme and a directory with the same name. Usually there is also a font folder and a folder with system files.
If you have a font folder, extract that and install all the fonts (right-click each one and choose Install…).
Now copy the .theme file and the corresponding directory, Crystal Gloss.theme and the Crystal Gloss directory in my case, to C:\Windows\Resources\Themes assuming C:\Windows is your Windows directory.
For the more advanced themes you usually have one or two directories with .dll, .exe and/or .cpl files. These files add stuff like the back and previous button in explorer, a start button change etc. You would want to copy these files to the right directory in C:\Windows.
First thing to do is to rename the originals. I have a x64 folder (as I use 64-bit Windows) and a x86 folder (for compatibility with 32-bits applications) that need to be copied. The files ExplorerFrame.dll, shell32.dll and timedate.cpl from the x64 directory can be found in C:\Windows\System32\ while explorer.exe can be found in C:\Windows\ directly. Find the originals and take ownership of them to allow changing it. I will show you how to do this with explorer.exe, but needless to say the process is the same for all the files.
We need to take ownership of the file first as its normally only changeable by the system itself and not for users (even administrators have only read permissions).
Right-click on explorer.exe and click on “Properties“. Go to the tab “Security“, click on “Advanced“:

Go to the tab “Owner” and click on “Edit“:

Assign the ownership to your administrator group of your system by selecting it (usually Administrators(username\Administrators)) and click on “Apply“:

The current owner should now be your administrator account. Confirm that and press OK.
You will be back at the security tab of explorer.exe, we can now set the permissions so you can rename it. On this screen click on “Edit”:

Select your administrator account (usually Administrators(username\Administrators ) and check the option “Full Control“. Click on “Apply“:

Check if the checkboxes are all checked and press OK, now you can rename your explorer.exe to explorer.exe.BACKUP. Do the same for the other files in x64 in their original directory. Now copy those files from the theme zipfile into the specific locations.
For compatibility with 32-bits applications you also want the x86 folder even if you are on a 64-bits system. All these files are located in C:\Windows\SysWOW64\ on your system even the 32-bits explorer.exe. The process is the same, take ownership, rename them and copy the ones in the zipfile into the directory.
To take effect you can either restart explorer.exe in the Taskmanager or reboot your PC.
Change Start button
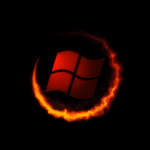
I didnt really like the red startbutton that came with the theme, so I swapped it out for Token Start Orb. This is actually really simple to do, what you want is a picture of the Start button you like 3 above eachother like so:
In this case I also recommend you use DeviantART because its a great source for these things. Search for Windows start Orb and you are bound to find something you like. To actually change the start orb I use Windows 7 Start Orb Changer. Its very simple and easy, the download page also has a short instruction on how to load the images.
Change Windows Boot Animation
To make it even more like my own thing, I’ve edited the Windows boot animation, the screen that says starting windows before you can actually log in. I now set it to this:
 Again DeviantART, sounding a bit like a broken record, but is a great source. Search it for Windows Boot Animation. Make sure to download boot skins with the .bs7 file extention (after unpacking from rar or zip ofcourse). After you choose one, put it somewhere you can find it easly (again, after unpacking it from rar or zip).
Download Windows 7 Boot Updater and open it as administrator. Now choose File -> Load Bootskin and open your file. Make sure it has the right screendimensions you use or it will look distorted. My bootanimation for example has 2 files one for 4:3 monitors and one for 16:9 widescreen, so I choose the latter. You can now set some options like the text you want to display on this screen, I set this to none. There is a play button in the bottomright corner to see how it’d look.
If you are done hit the Apply button, that’s it!
Change windows logon screen
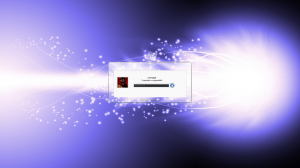
To make it complete I’ve changed the way my login screen looks to this:
I’ve changed the logon screen itself to Windows 7 Login Screen Reworked again search DeviantART for more.
This gives you a zipfile with usually an x64 and x86 folder. Since I am on an 64 bits system I put authui.dll from the x64 directory in Windows\System32 and the 32-bits version in Windows\SysWOW64.
To change the background on the logon screen take a jpeg picture and resize it to the dimensions of your main screen. Make sure to save it with so much compression that the filesize is under 256kb. I’ve used GIMP to do this, but every normal image editor is able to do it. About.com has excellent tutorials on using GIMP among them one on saving .jpegs in that application.
Give your image the name backgroundDefault.jpg and put it in C:\Windows\System32\oobe\info\backgrounds, create the subdirectories if they dont exsist.
I used Heavenly Kamehameha for my background.
Now press <WINDOWSKEY> + R, type regedit and press enter. Navigate to HKEY_LOCAL_MACHINE\SOFTWARE\Microsoft\Windows\CurrentVersion\Authentication\LogonUI\Background and check if the key OEMBackground exists.
If it exsists, open it and give it value 1, this enables the background. You can now close regedit.
If it doesnt exist, press right-mouse and add a new DWORD (32-bit) value. Name it OEMBackground and give it value 1, after this close regedit.
Rainmeter skins and Fences
For the sidebar I use Rainmeter, an application that lets you add all sorts of widget like apps on your desktop. It comes with a few skins installed but far more interesting are the custom made skins by the community. DeviantART has a huge collection of them on the rainmeter page or simply by searching rainmeter skin.
The one featured on the screen is my own creation named Dark Carnage found on my own DeviantART page and here in the downloads section. Installing and using Rainmeter is very intuitive, the skins are installed by simply doubleclicking the .rmskin file you download. In my case all the modules like the clock/date, Gmail checker, Music player etc can be chosen independently of the rest. Every skin in Rainmeter is also changeable after installing so you can create your own adaptations of any of them if you like.
After installing my Rainmeter Skin you can edit some options like Gmail password (for the checker) and RSS feeds in the settings file named variables.inc located in the Settings directory of the skin.
Since my skin is on the left hand side, I want to keep my desktop clean of icons. For that I use Fences Pro, an application that lets you create windows snapped to the background that hold the icons, the pro version lets you even create a fence for the default icons created by applications and what you drag or copy onto the desktop.
This keeps the desktop clean and stops icons getting “trapped” under a skin (specially on the left side when sorting) where you have to drag the skin out of the way to access the icon again.
Wallpaper
Special mention for the wallpaper I use, just because its so nice. Its named The Eternal Reaper-Colored, have I told you about DeviantART yet? 🙂


1 comment
Een beetje onderzoek zal over een lange weg te nemen als het gaat om online te verwerven
casino’s om te voldoen aan hun eisen .